Dry Brush watercolor tutorial
OBJECT: Learn dry brush watercolor painting techniques.
The parched painter MATERIALS USED: Arches #140 CP watercolor paper, Grumbacher 1" flat red sable, and Kolonok's #4 flat and #8 round Kolinsky red sable brushes.
COLORS USED (various manufacture): Cadmium Yellow Medium, Cadmium Orange, Cadmium Red Medium, Alizarin Crimson, Cerulean Blue, Cobalt Blue, Ultramarine Blue, Hooker's Green Dark, Burnt Sienna, and Burnt Umber.
First off, I lightly sketched a random landscape design on the watercolor paper using a #1 pencil.
With a light wash of Cerulean Blue I scumbled a rough sky in, dragging and pushing my 1" flat read sable to create texture.
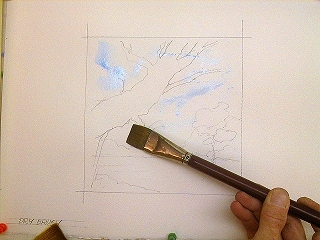 Laying some foundation washes I wanted some underlying tones
 to dry brush the subsequent strokes over.
I made a light wash of Hooker's Green Dark grayed with a touch of Alizarin Crimson and I painted the backround tree line around what is now determined to be a lake using the #8 round red sable .
Using a wash of Dioxazine purple I painted the shadow areas of the tree, keeping the edges rough with broken washes.
While this was still wet I added some blue accents with a mix of Cobalt blue.
 Letting the underpainting dry I tried to keep the underpainting
 as dry and broken looking as possible, except for the lake area which needed some suggestions of the reflections and flow of the water.
Using a gray made of Burnt Sienna, Cobalt blue and Hooker's Green Dark I scruffed in a foreground bank area.
I let the underpainting dry.
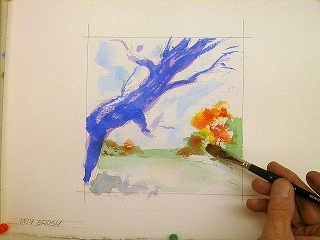
 A tree emerges I mixed up a strong blue wash
 from Cobalt and Ultramarine Blue using a #4 flat red sable.
Holding my brush at a rather severe angle I let it lay on the paper with varying pressure as I dragged strokes to create the shadows and texture on the tree trunk.
 It's Fall! After finishing the large tree trunk
 I decided it was fall (which it was at the time) and using all the Cadmium colors; yellow medium, orange, and red medium, I roughed in fall foliage with some rather garish colors.
I used the Kolonok #4 flat red sable for these washes.
 A change in plans As I finished the riot of color
 on the far banks I added a light wash of orange as a reflection in the lake of the large background tree followed by a run of pure Cadmium yellow medium down the bank under the far tree. I mixed a dark bluish gray from some Cobalt blue and Burnt umber and quickly drew in some dark accents strokes on the large tree trunk.
At this point I considered the flaming trees and though of the dark maroon maple trees across the street. Using the underpainting as a base I scrubbed in the main tree shape with a mixture of Alizarin crimson and Pthalocyanine green which gave an adequate maroon color.
As I worked on the big maroon tree in I relied on the natural spread of the #8 round red sable brush to help create convincing foliage textures.
 The classic water effect I decided the water in lake
 would be a greenish brown. I used Hooker's Green Dark and Burnt Umber to get a satisfactory color.
I start dragging texture parallel with the horizon line, across the lake using the not-too-wet #4 flat red sable.
 A lake appears before me As I pulled each stroke across the lake
 I varied pressure on the brush to create the "sparkly" water areas.
TIP: If your brush is too wet, you'll lay a flat wash. Blot your brush on a flat damp sponge or paper towel to adjust the amount of paint in the brush.
 A little detail and punch up Using Hooker's Green Dark
 I made a medium toned puddle of paint. I used my #4 flat red sable brush, charged, and blotted. I tweaked it between my thumb and finger to spread the hairs a bit.
Using an upward "flicking" motion I added some grasses under the tree. I used some of the same color on the far bank.
 Just a minute, almost done... I decided the lake had some swampy areas
 near the shore and I added some calligraphic indication of cattails.
By now, the blue in the sky was looking a little too light. I mixed up some more Cerulean Blue, a little darker this time, and scumbled the sky areas again.
Using the same blue and a #8 round red sable brush I added the sky color to the lake reflections.
Finished! Click image to enlarge.